Leg Exercises at Home: A Practical Guide to Building Lower-Body Strength Without Weights
Estimated reading time: 6 minutes
Key Takeaways
- Four Essential Patterns: A complete home lower-body workout covers knee-dominant, hip-dominant, unilateral, and ankle plantarflexion movements.
- Progression Over Equipment: You do not need barbells or machines; strength is built by manipulating tempo, leverage, range of motion, and unilateral variations.
- Weekly Frequency: Performing structured muscle-strengthening leg exercises at least two to three non-consecutive days per week supports muscle adaptation and joint stability.
- Controlled Execution: Prioritizing knee tracking, controlled eccentrics, and proper balance ensures effectiveness while protecting your joints.
Table of Contents
Introduction
You do not need a rack of barbells or a collection of machines to build dependable lower-body strength. A productive routine of leg exercises at home comes down to covering four basic movement patterns: a bilateral knee-dominant movement (such as a squat or sit-to-stand), a hip-dominant movement (such as a glute bridge), a single-leg exercise (such as a reverse lunge or step-up), and an ankle-strengthening movement (such as a calf raise).
Working these movements with good form and sufficient effort at least twice a week can stimulate muscle growth, improve joint stability, and make everyday movements like climbing stairs or carrying groceries feel noticeably easier.
The main challenge with home training is not finding an exercise that works; it is knowing how to make that exercise sufficiently demanding over time. Moving your body through space produces genuine resistance, but your muscles only adapt if you give them a reason to do so. Here is how to structure a complete lower-body workout at home, execute each movement safely, and scale the difficulty as you get stronger.
The Core Four: A Balanced Home Leg Routine
Many home workouts make the mistake of relying entirely on high-repetition bodyweight squats. While squats are valuable, relying on them alone neglects the back of the thighs, underworks the stabilizing muscles around the hips, and misses the lower legs.
A well-rounded routine trains both the front (anterior chain) and back (posterior chain) of the lower body, while balancing bilateral movements (both legs working together) with unilateral movements (one leg working independently).
| CORE MOVEMENT PATTERNS | ||
|---|---|---|
| Pattern | Primary Muscles Targeted | Foundation Exercise |
| Knee-Dominant | Quadriceps, Gluteus Maximus | Chair Sit-to-Stand |
| Hip-Dominant | Glutes, Hamstrings, Lower Back | Floor Glute Bridge |
| Unilateral (Single-Leg) | Quads, Glutes, Adductors, Calves | Supported Step-Up |
| Ankle Plantarflexion | Gastrocnemius, Soleus (Calves) | Standing Calf Raise |
1. Chair Sit-to-Stand (or Bodyweight Squat)
The sit-to-stand targets the quadriceps on the front of your thighs and the gluteus maximus in your hips. Starting from a chair allows you to master hip hinging and knee tracking without worrying about losing balance at the bottom of the movement.
- How to do it: Sit near the front edge of a sturdy, non-rolling dining chair with your feet flat on the floor, roughly shoulder-width apart. Lean your torso slightly forward from the hips, keeping your chest open and your spine neutral. Press your entire foot into the floor, engage your thighs and glutes, and push smoothly to a full stand. Pause for a second at the top, then hinge at your hips and lower yourself under control back to the seat. Avoid dropping or collapsing into the chair.
- Easier modification: If standing up unassisted is difficult or painful, place a cushion or folded blanket on the seat to raise the starting height by two to three inches. You can also place your hands on the chair arms or your thighs to assist lightly during the ascent.
- Harder progression: Tap the chair seat lightly with your hips for a fraction of a second without resting your weight, then stand back up immediately. Once that feels comfortable, remove the chair entirely and perform a standard bodyweight squat, descending until your thighs are roughly parallel to the floor while maintaining a flat back and heels planted.
2. The Glute Bridge
While squats require hip extension, they emphasize the quadriceps. The glute bridge shifts the workload directly to the gluteus maximus and the hamstrings on the back of your thighs, sparing the knee joints from deep flexion angles.
- How to do it: Lie on your back on a mat or carpet with your knees bent and feet flat on the floor, spaced hip-width apart and roughly six to eight inches from your buttocks. Rest your arms comfortably by your sides. Press your heels into the floor and lift your hips toward the ceiling by contracting your glutes. The NHS lower-limb exercise guidance advises lifting until your thighs and torso form a straight line, pausing briefly, and then returning to the start with controlled movement. Avoid over-arching your lower back at the top; your ribs should remain relaxed downward.
- Easier modification: If you feel cramping in the back of your thighs, walk your heels an inch or two closer to your hips to place more emphasis on the glutes rather than the hamstrings. If your range of motion is limited, raise your hips only as high as comfortable without forcing the movement.
- Harder progression: Slow down the lowering phase so it takes three to four seconds to return to the floor. Alternatively, cross one ankle over the opposite knee and perform a single-leg glute bridge, keeping your pelvis level throughout the entire repetition.
3. Supported Reverse Lunge or Low Step-Up
Bilateral exercises allow your stronger leg to subtly take over the bulk of the work. Unilateral (single-leg) exercises force each leg to stabilize and produce force independently. They also challenge the smaller stabilizing muscles around the pelvis, including the gluteus medius.
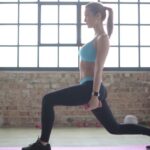
- How to do it (Supported Reverse Lunge): Stand tall with your feet hip-width apart, holding onto a sturdy kitchen counter, table, or wall with one hand for balance. Take a controlled, comfortable step backward with your left foot. Lower your back knee toward the floor while bending your front knee. Descend only as far as your strength and comfort allow. Press firmly through the heel and midfoot of your front right leg to return to the standing position.
- Key alignment cue: During any lunge variation, keep your front kneecap aligned with your second toe rather than letting the knee collapse inward toward the midline. This tracking advice is emphasized in clinical lower-limb resources from the NHS to encourage stable knee mechanics.
- Alternative (Low Step-Up): If stepping backward feels uncomfortable for your knees or balance, use the bottom step of your household stairs. Place one entire foot flat on the step. Press through that heel to step up, lightly touching your trailing foot to the step, then slowly lower yourself back down with the same trailing leg. Keep your torso tall and control the descent rather than falling backward.
4. Standing Calf Raise
The lower leg muscles—the gastrocnemius and soleus—are essential for absorbing impact during walking, stabilizing the ankle joint, and propelling your body upward and forward.
- How to do it: Stand upright with your feet hip-width apart, facing a wall or holding the back of a sturdy chair for light balance support. Press down evenly through the balls of both feet and raise your heels as high as possible. Pause at the top for a full second, then take two to three seconds to lower your heels back down until they touch the floor.
- Easier modification: Perform the movement seated on a chair with your feet flat on the floor, pressing up onto your toes. While this reduces the total resistance to just the weight of your lower legs, it helps reintroduce ankle movement if standing raises cause discomfort.
- Harder progression: As outlined in the NHS lower-limb exercise guidelines, you can progress from a double-leg heel raise to a single-leg heel raise once you have sufficient strength and control. Lift one foot slightly off the floor and perform all repetitions on a single leg, maintaining steady contact with a wall for balance so that ankle stability, rather than whole-body tipping, is the focus.
How to Structure Your Week: Sets, Reps, and Frequency
To build strength and maintain physical function, the World Health Organization physical activity guidelines recommend that adults perform muscle-strengthening activities involving all major muscle groups on at least two days per week. The WHO physical activity fact sheet reinforces that strength work across the week yields broad health benefits, from improved metabolic health to functional independence.
For general fitness, this does not require daily workouts. Training your legs two or three non-consecutive days per week (for example, Tuesday and Friday, or Monday, Wednesday, and Saturday) gives muscle tissue sufficient time to recover between sessions.
| STARTING HOME LEG ROUTINE TEMPLATE | |||
|---|---|---|---|
| Exercise | Sets | Repetitions | Rest Between Sets |
| Chair Sit-to-Stand | 1–3 | 8–12 | 60–90 seconds |
| Floor Glute Bridge | 1–3 | 8–12 | 60–90 seconds |
| Supported Lunge/Step-Up | 1–3 | 6–10 per side | 60–90 seconds |
| Standing Calf Raise | 1–3 | 8–15 | 45–60 seconds |
Understanding Volume and Effort
If you are new to resistance training, start with a single set of each exercise. One challenging, high-quality set per movement pattern is enough to stimulate initial strength gains while minimizing deep muscle soreness the next day. After two to three weeks of consistent training, move up to two sets, and eventually three sets if your recovery allows.
A general repetition range of 8 to 12 repetitions works well for multi-joint movements like squats, bridges, and lunges, while calves often respond well to slightly higher repetition targets (8 to 15 repetitions).
However, you should not treat these repetition numbers as rigid rules. A summary of the ACSM position stand on resistance training notes that muscular adaptations can occur across varied loading strategies, provided that the training involves progressive demands and adequate effort. In practice, that means the final two repetitions of a set should feel genuinely challenging to complete with strict form. If you reach 12 repetitions and feel you could easily complete ten more, the exercise has become too easy to stimulate further adaptation.
Rest Intervals
Rest between sets until your breathing has settled and your working muscles feel ready to produce solid effort again. For most bodyweight leg exercises, a rest period of 60 to 90 seconds between challenging sets is practical. If an exercise leaves you breathing heavily, wait up to two minutes before starting the next set. There is no benefit to rushing into the next set with poor technique simply to keep your heart rate high.
How to Make Bodyweight Exercises Harder (Without Buying Equipment)
When you train with weights, making an exercise harder is straightforward: you add five pounds to the bar. With bodyweight training, you have to apply progressive overload by manipulating mechanics, leverage, and time.
The American College of Sports Medicine progression guidance underscores that resistance training requires systematic progression over time to continue driving adaptations. Simply repeating the exact same easy set of ten squats month after month will maintain a baseline, but it will not continue to build strength.
To progress your home leg exercises safely, adjust one variable at a time using the following strategies:
1. Slow Down the Eccentric (Lowering) Phase
Muscles can produce substantial force while lengthening under control. Instead of dropping down into a squat or bridge in one second, take three full seconds to lower yourself down, pause for one second at the bottom, and stand up smoothly. This dramatically increases time under tension without placing sudden shock on your joints.
2. Increase the Functional Range of Motion
If you are doing chair sit-to-stands, switch to a lower chair or an unassisted squat that brings your thighs closer to parallel with the floor. If you are doing step-ups onto a four-inch step, move to an eight-inch step. Moving through a larger joint angle requires more muscular control and recruits more muscle fibers.
3. Transition from Two Legs to One
Single-leg variations instantly increase the load placed on the working limb. Moving from a standard glute bridge to a single-leg bridge effectively doubles the resistance each hip must manage. The same progression applies when moving from a standard two-legged squat to a supported reverse lunge or single-leg box squat.
4. Add Improvised External Load
When bodyweight variations become easy, you can introduce external weight using household items. Place a few thick books or water bottles inside a backpack, zip it up, and wear it securely against your chest or back while performing squats, step-ups, or lunges. This allows you to apply progressive overload in measurable increments without dedicated gym hardware.
Common Mistakes to Avoid
- Rushing the movement for momentum: Bouncing out of the bottom of a squat or using a jerky swing to get out of a chair transfers the work away from your muscles and onto your passive connective tissues. Every repetition should have a distinct start, middle, and finish.
- Allowing knees to cave inward: During both squats and lunges, weak hip abductors can cause the knees to buckle inward (valgus collapse). Always think about keeping your knees tracking in line with your toes.
- Training through sharp joint pain: Mild muscular fatigue and a burning sensation in the working muscles are normal responses to exercise. Sharp, localized pain inside a joint (such as under the kneecap or in the front of the hip) is not. If an exercise causes joint pain, reduce the depth of the movement, switch to a supported variation, or stop that specific exercise.
- Neglecting footwear and floor grip: Doing lunges or step-ups in smooth socks on polished hardwood or tile is a slip hazard. Train barefoot, in non-slip socks, or in flat, supportive athletic shoes on a stable surface.
- Confusing clinical rehabilitation with general fitness: Patients recovering from joint surgery or chronic tendon issues are sometimes given high-frequency, low-load exercises to perform several times a day. As the NHS lower-limb exercise resource clarifies, specific clinical exercise routines are designed for individual patient rehabilitation and should be checked with a healthcare professional before starting. Do not mistake a high-frequency rehabilitation sheet for a universal fitness program; healthy adults looking to build strength do best with dedicated training sessions interspersed with recovery days.
Safety, Individual Differences, and When to Seek Help
While lower-body resistance exercise is safe and beneficial for the vast majority of people, individual capabilities vary widely.
If you have a history of orthopedic surgery, severe osteoarthritis, persistent joint swelling, balance disorders that increase your fall risk, or a cardiovascular condition, speak with a qualified physical therapist or doctor before beginning a new home exercise program. They can help establish appropriate ranges of motion and choose variations suited to your joint health.
Always stop your workout immediately if you experience dizziness, shortness of breath beyond normal exercise exertion, chest discomfort, or sudden, sharp pain.
Next Steps
To begin, do not try to overhaul your entire physical routine overnight. Pick two days this coming week—such as Tuesday and Friday. Run through the four core exercises described above, completing one or two controlled sets of each movement. Focus entirely on moving smoothly, tracking your knees carefully, and recording how many repetitions you completed with solid form. Once you can hit the top end of the repetition targets across all sets with control, introduce one of the progression methods to keep your training productive.
Frequently Asked Questions
Can you build real leg muscle with just bodyweight exercises?
Yes. Muscle adaptation responds to mechanical tension and effort rather than the specific source of weight. By using single-leg variations, increasing your range of motion, and slowing down the lowering phase, you can generate sufficient intensity to stimulate lower-body muscle growth and functional strength.
How many times per week should I train my legs at home?
Training two to three non-consecutive days per week (for example, Tuesday and Friday or Monday, Wednesday, and Friday) is optimal for most adults. This schedule aligns with public health guidelines and ensures your muscles have 48 to 72 hours to recover and adapt between workouts.
What should I do if squats hurt my knees?
Start with an elevated chair sit-to-stand or a partial-depth squat to reduce knee flexion angles. Ensure your knees are tracking in line with your second toe rather than caving inward. You can also prioritize the glute bridge, which strengthens the posterior chain without placing deep flexion stress across the knee joint.
How long should I rest between sets?
A rest interval of 60 to 90 seconds works well for most bodyweight exercises. If you feel winded after a challenging set of lunges or step-ups, rest up to two minutes to ensure full recovery before starting your next set with strict form.